Doom Screen Melt
Trying to recreate Doom's classic screen melt effect in Unity

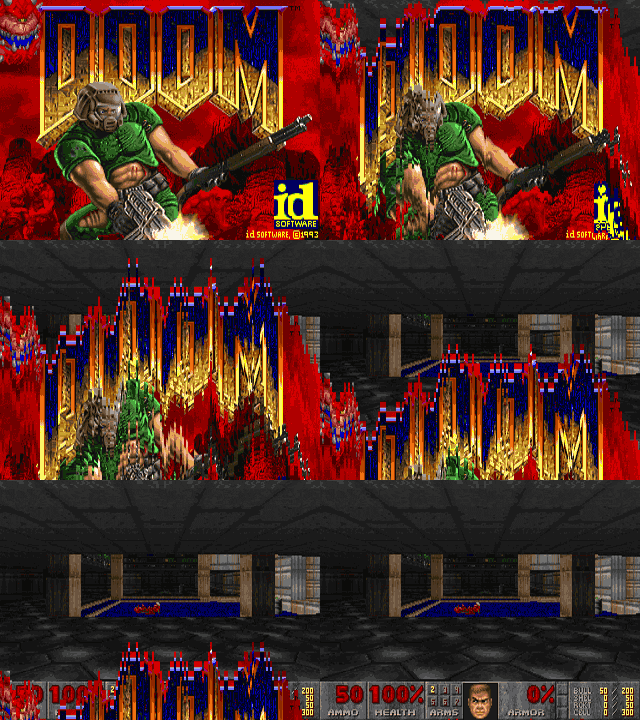
I can't remember how I ended up on the below screen melt page. Lock down has my memory all over the place, regardless... I thought how can I go about recreating this using Unity.

I wanted to make the melt effect more interesting by using a scene that had animated elements. I hoped that it would make the effect more impressive that it actually is. Besides I might as well take advantage of some of the tools Unity has to offer. In this case Render Textures.
Originally I wanted to create this effect in the Shader Graph. Which is still somewhat of a dark art to me. I wasn't sure how to go about that so thought it better to attempt it first using Unity's Texture2D API. This should give me a better understanding once I try it in the Shader Graph.
The first step with recreating anything really is to study the effect. This melt is pretty simple and quite easy to visually see what’s going on.
Texture is split into sections. Given a random speed or position on the Y and moved over time off the bottom of the screen. There is a slight wave to the split, before it falls, maybe a slight delay. They could be using a sine function to move the splits in the Y.
Below are the steps I thought were the quickest and easiest way to create the effect.
Steps
- Create two different scenes in Unity, keep them simple but show movement.
- Set up a camera and a render texture for the output.
- Use the render texture as a rawimage in a Unity UI Canvas.
- Set up a second camera to display the canvas.
- Add a button to the UI Canvas to trigger the melt.
- Take an image of what the camera sees
- Chop image up depending on resolution
- Place in front of the render texture
- Hide the original scene, show the new scene
- Slide the chopped off image from the screen.
- Destroy the chopped up image.
Result
I thought all in all the melt effect would take a couple of hours to program badly. It ended up taking 12 or so in total. I kept running into a UI scaling issue after I sliced the image into smaller separate images or 100 x 100.
After banging my head on the table for around 8 hours I decided to chop my images up into rectangles. Rectangles strips would be more efficient (100 x 1080). I had to accept that the image created from them was going to be slightly off when it came to scale. After
After implementing this change images still appeared as a cube. I was expecting long 1080p strips. After some investigation with the Image component i found the Set Native Size option.
This option is used to set the image dimensions. If enabled it will set the original dimensions, In this case 1080p. If not enabled you’ll get a squared image that you can scale via the scene menu..
Frustrating, I didn't come across a reference to this in any of the canvas documentation. Anyway, once I enabled it via the script everything scaled as expected
Code
The code can be found here and it has plenty of room for improvement such as,
- Reset the slices parent position as at the moment its forever falling.
- Automatically remove the slices from the scene when they have left the camera view.
If anyone knows a more efficent way to grab the screen i would be really interested so hit me up.

